This area does not yet contain any content.

Entries in Kim's renos and decos (142)

Friday
Dec192008

Backsplash, table and more decorating

This blog chronicles my entire kitchen renovation from start to finish. Greentea Design has provided me with their solid wood kitchen cabinets, and I'm taking care of the rest.

If you'd like to be brought up to date, check out my kitchen remodel blog for an archive of previous posts. I posted recently about a few more completed items and some finishing touches, and now for the backsplash, dining table and yet more decorating.

Last Friday the backsplash was installed. I was excited to not have to see the unfinished edge of the countertop finally, but the result was very disappointing. I decided to use the quartz of the countertop and have about a 4" high piece installed along the back of the countertop. The guy that installed it showed up and started bringing in these really short pieces of the quartz which had me a tad confused. They were not the length of each cabinet section. Turns out there were 6 pieces, each one exactly half the length of each cabinet section. Meaning there was a seam down the center of section. Then I watched him silicone everything in place, and then tell me he was all done. I said "HUH? You aren't going to fill in those seams??" He says nope, they just silicone backsplashes. ALLRIGHTY THEN. He left and I called the shop and was told that they had told me they were going to use offcuts. I wasn't told the whole story then if that was the case. I said it looked totally unfinished and the seams weren't filled in. Turns out in the new year they will order a slab of the 3/4" (which is what I had wanted but they didn't have enough of so they used the 1 1/4"), and redo it. I can live with it for now and hope to see a proper backsplash next month. So these photos show the seam, and hopefully one day soon I can show you what it SHOULD look like. (Luckily with the kitchen counters dressed, it's not as noticeable).


It's just before Christmas and I finally have a dining table. It's actually not completed yet but it's useable and I'm very excited about that. I can now eat meals not hunched over my small marble table that was WAY too short to eat at. Also, the kitchen was designed so that I could use it as a second office because the office at the back of the house is cold in the winter and I wanted to be able to work at the dining table and watch the TV in the living room. My contractor built it, and suggested a pedestal base, which was a BRILLIANT idea because you don't see legs from the living room and the top looks like it's floating. It still needs a couple pieces to make it more sturdy because it's quite tippy right now, especially when the porkier of the cats jump from the counter onto it. YIKES! (I should mention as I'm sure some will notice, that the table is warped. My contractor made it in a hurry and then brought it over and it warped quite a bit in the cold/heat. As a result he won't charge me for it...but I'll give him something because it is usable).


Click HERE to see more photos of some decor items I purchased, the completed basement hatch and more.

Thursday
Dec112008

Some finishing touches

This blog chronicles my entire kitchen renovation from start to finish. Greentea Design has provided me with their solid wood kitchen cabinets, and I'm taking care of the rest.

If you'd like to be brought up to date, check out my kitchen remodel blog for an archive of previous posts. I posted recently about the countertop installation, and now for a few more completed items and some finishing touches.

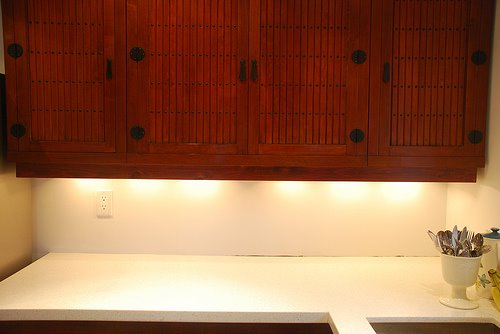
The kitchen is SLOWLY finishing up, and since some readers have been asking where things are at I took some photos the other day around the space and my living room as well. But first I'll show some things that were finished lately. First up is the valance my contractor made to hide the under-cabinet lighting since the cabinets are basically flush underneath. He found wood with a grain and stain that perfectly matches the cabinets. I asked him to do it simple with squared edges and it blends so well.


Trim was installed along the base of the cabinets because my contractor made sure they were perfectly level and had to put some shims underneath in a few places which could be seen. I was unsure of how it would look at first but it's growing on me.


Then there is the hatch over the basement stairs. It's been painted, and a hole has been cut for all the cats to go down to the litter boxes. It was hilarious seeing them climb in and out once it was cut, checking it out.


I also got the contractor to completely frame out the box he built over the upper cabinets so it looked more finished and now that it's painted out it doesn't stand out so much.


My boyfriend (and I) were going to make a dining table out of wood that I would paint, but my contractor offered to do it since he had the proper tools and so far I've gotten the top and I'm still waiting for a base. He offered to build that too, and suggested a pedestal style which I think would be perfect to keep the space open. This is the table top placed on top of my marble side table I'm currently using as a makeshift dining table. (Check out the girth of Felix! I'm starting to worry at the rapid rate of his porkiness). And as some of you may notice, I bought a second Panton chair, and 2 more chairs which you'll see further in this post.


That's all the progress to date. The backsplash is being installed tomorrow, and the shocks to keep the hatch open will be installed this weekend. I've got to contact my contractor how's been MIA for a few days now but I'll forgive him due to the insane weather we've been having.

Now for some photos I took around the kitchen and living room....

You'll have to click HERE to see them. :)

Wednesday
Dec102008

My mug in a mag

Some of our readers have noticed that we were mentionned in this month's Canadian House & Home magazine. They did a story called Our Favourite Canadian Design Blogs and since this blog is half Canadian they wanted to include the blog and me! It is such an honour. I have subscribed to H&H for years and it is by far one of my favourite mags.


An AMAZING local photographer, Jordan Craig, came by one morning and photographed me in my home office and took some photos of vignettes around the house (which to my dismay none were used). To my relief he brought along his wife who applied my makeup (and I took note!). It was a total blast, Jordan and his wife were awesome, and he brought along the coolest camera I've ever seen (a Hasselblad from the 60s with an attachment where the film would go to make it digital). I asked my boyfriend to help me take photos of the process and both of us forgot for the most part. Here are a few we did manage to take.


Jordan was kind enough to send me the photos he took around my office and living room. They are fantastic so I thought I would share them.


Congratulations to the other bloggers included (Jan of poppytalk, Marie-Eve of Lake Jane and Arren of Arren Williams Design Lab, and thank you Jordan and House & Home!!

UPDATE: Check out the story on H&H's website HERE

Thursday
Dec042008

Countertop installation

This blog chronicles my entire kitchen renovation from start to finish. Greentea Design has provided me with their solid wood kitchen cabinets, and I'm taking care of the rest.

If you'd like to be brought up to date, check out my kitchen remodel blog for an archive of previous posts. I posted recently about the completed lighting, and now for the countertop installation.

Choosing a countertop was quite an adventure. I had a particular idea of the look in mind and was searching for something that wasn't going to break the bank. I ended up going with a quartz called specchio white that is exactly what I wanted and for a great price. I am so happy that I went with a light coloured counter because it brightens up the space so much. I think it looks incredible against the cabinets. The material I chose has lots of grey and silver flecks in it that sparkles. SO PRETTY. As usual, I took many photos and in this case I took some during the installation process as well because I found it fascinating.

To start the installation, my contractor had to cut a hole for the sink. I found this to be too painful to watch so I quickly snapped a couple photos and proceeded to stare out the window whilst cringing in agony.


This next photo is the first piece (there are 3) simply set down on the cabinet. Looking good already!

To see the completed countertop with sink and faucet in place, click HERE.

Monday
Dec012008

Lighting completed

This blog chronicles my entire kitchen renovation from start to finish. Greentea Design has provided me with their solid wood kitchen cabinets, and I'm taking care of the rest.

If you'd like to be brought up to date, check out my kitchen remodel blog for an archive of previous posts. I posted recently about the arrival of the appliances and some other odds and ends, and now for the completed lighting.

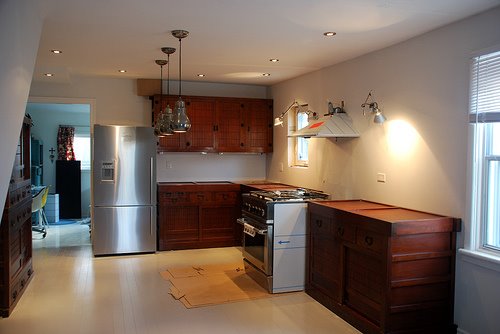
The lighting and wiring in my new kitchen is FINALLY completed. Everyone always says how key lighting is in a space and guess what? They're RIGHT!! The kitchen looked great once the cabinets were in but now that it's properly lit, WOW - the cabinets look even more fabulous. What a difference from the old kitchen, with one ceiling fan with 3 lights, and a lamp on the counter. Now I have 9 potlights, 3 pendants, 2 wall lamps and under-cabinet light strips. Funny thing is now that the kitchen is so well lit, all the other rooms have such crappy lighting in comparison.

Here are a few photos of the kitchen taken right after the electrician finished up (hood fan was mid-installation).


The pendants I bought at Crawford Alexander turned out to be a perfect fit with the look I was going for. They are industrial and fun and quirky...and since I have no dining table yet, everyone is cursing them because we've all bashed our heads on them numerous times. I have regular bulbs in them but because of the shape of them they give off hardly any light so I have to pick up some floodlights to use instead.


To see the rest of the lighting in place, including my Tolomeos which I am totally in love with, click HERE.