This area does not yet contain any content.

Entries in Kim's renos and decos (142)

Tuesday
Oct072008

Appliances

This blog chronicles my entire kitchen renovation from start to finish. Greentea Design has provided me with their kitchen cabinets, and I'm taking care of the rest.

If you'd like to be brought up to date, check out my kitchen remodel blog for an archive of previous posts. I started talking about some of the fun purchases that goes along with a kitchen renovation in my last post....now it's time for appliances.

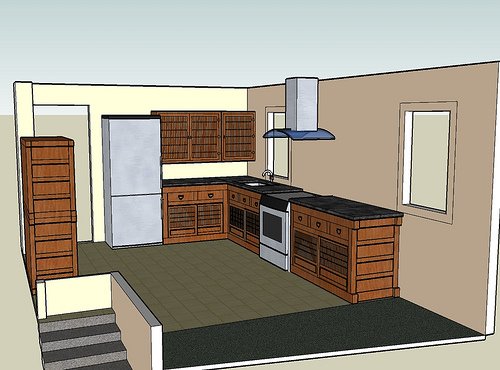
My selection of appliances follows a common look and feel with my lighting choices. It’s all about a sleek and industrial look, in stainless steel. And frankly, anything would be better than the appliances that came with the house. The current fridge is a full fridge, with no freezer. ???? The freezer is a large chest freezer located in the basement. I used to have a small and very cheap hood fan (that someone had spray painted white), but it was rusty and dirty and installed too low so I threw it out a couple months after moving in.

When I started thinking about appliances, I knew I had to go with stainless steel. Now, sometimes I think stainless appliances are over-rated, with fingerprints and dents showing up so much more than on black or white ones, but these days they come in brushed stainless, which tends to masks prints. So I’ve slowly grown to love them. Had I redone my kitchen with white cabinets like I had initially planned before this partnership with Greentea began, I may have been tempted to go with white appliances. I like the look of them blended in with the cabinets. But since my cabinets are sort of a teak coloured wood, and I want to keep the space as bright as possible, I decided to go with stainless. Black would have been way too dark, and white I think would have stood out too much against the cabinets. Plus, I really like how the stainless looks in the Chalet Chic kitchen on Greentea’s site.


I really love the pairing of the Asian style and colour of the cabinets (almost rustic looking) with the sleek look of stainless appliances. I think it’s a nice juxtaposition. (The fridge above is a Liebherr that I saw in a showroom...and sadly it was pricey).

To see how easy it was to blow a serious amount of money, click HERE.

Sunday
Oct052008

At Kim's house

Things are a little nutty at my house, as I'm trying to get some projects finished before the kitchen renovation work needs to start. I had 2 things I was determined to complete, the renovation of my staircase to the second floor, and my basement.

I took Friday off from work to start the stairs and I managed to get them pretty much done. A couple paint touch ups and a few nail holes left to fill but I am too tired to finish it. I thought I'd show some before photos first so you can see what I've been living with since December. This first photo is what the stairs looked like for about a month after I moved in.


I ripped the carpeting off because it was so dirty (from moving in a snowstorm) and not installed properly - I almost took a tumble down them a few times. This is the horror that was underneath. Linoleum tiles, aluminum trim and lots of paint splotches.


I am dying to paint all the floors in my house white, so the stairs were no exception. I painted them white, and the staircase is now so much brighter than it was. Now if I could just figure out how to get them to clean themselves...


Here is why I am too tired to finish the stairs. Below are photos of the remnants of what was on the floor in my damp and leaky basement (there's more that has to come out but I'm too tired and need help with the rest). I am so pissed off that someone was stupid enough to decide to hide leaks by putting down layer upon layer of plywood on a damp floor. The smell once the top layer of linoleum was removed was so disgusting. The wood in some places was BLACK and crumbly. I am afraid my cats and I will get sick from the mold. I wore a mask while I was working down there but the smell was so bad I can still smell it, and I feel kind of nauseous. There are alot of annoying and poorly executed things I keep finding around this house, but this one definitively tops the list of bad judgement.

Thursday
Oct022008

Lighting

This blog chronicles my entire kitchen renovation from start to finish. Greentea Design has provided me with their kitchen cabinets, and I'm taking care of the rest.

If you'd like to be brought up to date, check out my kitchen remodel blog for an archive of previous posts. I’ve described my cabinets in detail, so now I thought I’d start in on all the fun purchases that goes along with a kitchen renovation. These next few posts I will cover things like the appliances, sink, faucet, countertop, backsplash and lighting.

I thought I’d start with lighting, one of my favourite items to dress up a space. I have always been drawn to lamps and pendant lights, so when I was planning the lighting for the kitchen, I wanted to make it a focal point. But once I decided on making lighting a feature, I started to panic a bit. There aren’t many decent lighting stores in this city, but I did check out a few. I started looking online as well but got a bit concerned about some of the shipping prices. One online store was quoting 20% of the purchase for shipping and other related costs. This renovation is going to have me in debt as it is, and my house needs a TON of other work, so I have a really hard time spending my hard earned money on high shipping costs. So I really wanted to try and find items locally.

Since my kitchen will be long and narrow, I will need a long and narrow dining table to be placed down the center of it (I have no dining room). I made a pretty simple decision to hang pendants over it. My first thought was a Nelson bubble lamp. I’ve always wanted one. But I really like the look of the saucer lamp, and I think that one would work better over a round table. I started looking locally and found something at a large lighting store called Multi Luminaire:


I liked the industrial look of it and it was similar to ones I had considered ordering online. They had 2 sizes, one for $80 and one for $120, and I figured I would get maybe 3 to hang in a row over the table. But then....

More of this post HERE

Monday
Sep292008

Cabinet detail

This blog chronicles my entire kitchen renovation from start to finish. Greentea Design has provided me with their solid wood kitchen cabinets, and I'm taking care of the rest.

If you'd like to be brought up to date, check out my kitchen remodel blog for an archive of previous posts. In this post I will show you sketches of the cabinets I chose, what my cabinets cost, and the process involved with ordering kitchen cabinets from Greentea.

In my last post I showed some of the sketches Greentea created to demonstrate how my kitchen will look. Here is one for a recap.


I thought I would show the sketches that were designed by Greentea that include the dimensions of each cabinet ordered for my new kitchen. This first one is the base cabinet that will be next to the fridge. I love it because Mike suggested instead of having 3 drawers the same size, that the drawer on the left be 3 smaller drawers for take out menus, chopsticks etc. The cost of this cabinet is $1200.


More of this post HERE

Sunday
Sep282008

Around the house

I realized it's been a while since I posted about work I've done to the house or results of thrifting trips. That's because I've been so busy shopping and planning my kitchen renovation that I haven't had time to do anything else. I have been trying to work on redoing my stairs, but it's always a work in progress so no photos yet. I went looking for appliances on Friday since I had the day off, and went to a couple of my favourite antique shops since I was close by. There wasn't much that caught my eye, but at Found Design, an awesome mid-century shop, I picked up a really cute wooden cat (can't remember who the owner said makes it) and a gorgeous piece of fabric. Kitchen curtains perhaps??